Tutorial: Build Your First Application in the EBRAINS UI Ecosystem
In this hands-on tutorial, you’ll create a working React application in the EBRAINS UI Ecosystem monorepo. You’ll learn the complete development workflow from project generation to running your app locally.
What you’ll achieve: A working “Hello EBRAINS” React app running on your machine
Time required: 45-60 minutes
Prerequisites:
- Node.js v20.15.1 and npm installed
- Visual Studio Code installed
- Basic React/TypeScript knowledge
- Git basics
- EBRAINS GitLab access
Introduction: What is the EBRAINS UI Ecosystem?
The EBRAINS UI Ecosystem is a monorepo that contains EBRAINS web applications, libraries, and shared components.
Why a Monorepo?
Benefits you’ll experience:
- Shared configuration - Linting, testing, and build tools work everywhere
- Code reuse - Use the same components across multiple apps
- Consistent tooling - Same commands work for all projects
- Atomic changes - Update library and apps that use it in one commit
- Type safety - TypeScript works seamlessly across boundaries
What we use:
- NX - Smart monorepo tool that handles builds and dependencies
- React - UI framework (Angular also supported)
- TypeScript - Type-safe JavaScript
- Vite - Fast build tool and dev server
- EBRAINS Design System - Shared UI components
Part 1: Clone and Set Up the Ecosystem (15 minutes)
Step 1: Configure Monorepo
If you haven’t already cloned the ecosystem, follow the steps here
Step 2: Understand the Monorepo Structure
Let’s explore the key directories:
Key insight: Your new app will go in apps/sandbox/ for experimentation and learning.
Part 2: Create Your App (Method 1 - NX Console GUI) (15 minutes)
NX Console provides a visual interface for generating projects. Perfect for beginners!
Step 1: Install NX Console Extension
In Visual Studio Code:
- Open the Extensions panel (Cmd/Ctrl + Shift + X)
- Search for “Nx Console”
- Install Nx Console
- Reload VS Code if prompted
You should now see an “NX” icon in the left sidebar.
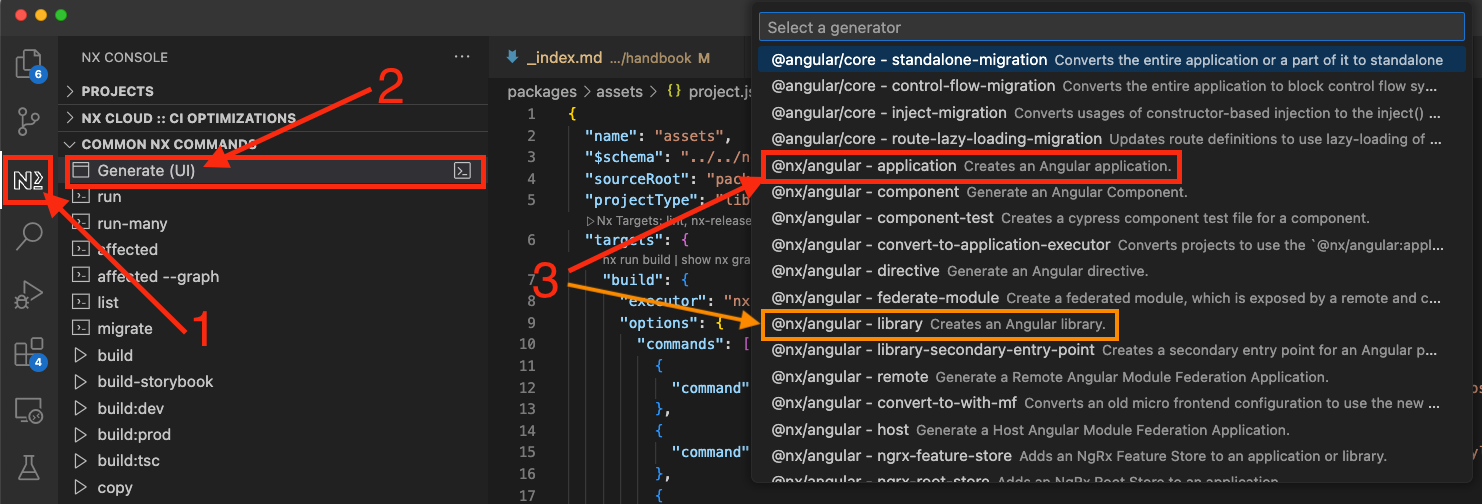
Step 2: Open NX Console
- Click the NX icon in the left sidebar
- You’ll see “Generate & Run Target” options
- Click “generate” → "@nx/react - application"
This opens a form for creating a React app.
Step 3: Configure Your Application
Fill in the form with these values:
| Field | Value | Description |
|---|---|---|
| name | hello-ebrains | Your app’s name (lowercase, hyphens only) |
| directory | apps/sandbox/hello-ebrains | Where to create it |
| style | css | Styling approach (CSS is simplest) |
| bundler | vite | Build tool (Vite is faster) |
| routing | false | Skip routing for this simple app |
| unitTestRunner | vitest | Testing framework |
Step 4: Generate the Application
- Review your settings
- Click “Run” at the top
- Watch the terminal as NX generates your app
You’ll see output like:
Your app is created at apps/sandbox/hello-ebrains/
Part 3: Create Your App (Method 2 - CLI) (Alternative Method)
Already created your app using NX Console? Skip to Part 4.
Prefer the command line? Here’s how to create the same app with one command:
Understanding the command:
nx generate- Create a new project@nx/react:application- Use the React app generatorhello-ebrains- App name--directory- Where to place it- Other flags configure the app
Part 4: Explore the Generated Files (10 minutes)
Let’s understand what NX created for you.
Key Files in Your New App
Navigate to apps/sandbox/hello-ebrains/:
Understanding project.json
Open apps/sandbox/hello-ebrains/project.json:
What this means: NX knows how to build, serve, lint, and test your app using these target configurations.
Part 5: Run Your App for the First Time (10 minutes)
Step 1: Start the Development Server
From the root of the monorepo (not inside your app folder):
You’ll see Vite starting up:
Step 2: Open in Browser
- Open your browser
- Navigate to
http://localhost:4200 - You should see the default NX React welcome page!
What you’re seeing:
- The default React app that NX generated
- Hot reload is active - changes update instantly
- Dev tools are enabled in the browser console
Step 3: Test Hot Reload
Keep your browser open and edit apps/sandbox/hello-ebrains/src/app/app.tsx:
Find this line:
Change it to:
Save the file. Your browser should update instantly without refreshing! You can see changes live in the browser.
Part 6: Run Ecosystem Commands (10 minutes)
The EBRAINS ecosystem provides several commands to ensure code quality.
Build for Production
Create an optimized production build:
Output goes to dist/apps/sandbox/hello-ebrains/. These are the static files you’d deploy.
Run Linting
Check for code quality issues:
Note: Your app automatically uses the global ESLint shared configuration from the monorepo. There’s no need to create your own linter config - it’s already configured and consistent across all apps!
If you see errors, NX will tell you exactly what to fix.
Run Tests
Execute your unit tests:
The default test (in app.spec.tsx) should pass:
View Project Graph (Bonus)
See how your app fits in the ecosystem:
This opens a browser showing all apps and libraries, with lines showing dependencies. Find your hello-ebrains app in the graph!
Part 8: Create a Commit (10 minutes)
Let’s save your work following EBRAINS conventions.
Step 1: Create a Feature Branch
Step 2: Stage Your Changes
Step 3: Commit with Proper Format
Step 4: Push to GitLab (Optional)
If you want to share your work:
Your app is committed with proper EBRAINS conventions!
Troubleshooting
Problem: Port 4200 is already in use
Symptoms: Error message saying port is busy
Solution 1: Stop other dev servers
Solution 2: Use a different port
Problem: nx: command not found
Symptoms: NX commands don’t work
Solution: NX is installed locally. Use npx:
Or install NX globally:
Problem: Module not found errors
Symptoms: Import errors when running the app
Solution: Reinstall dependencies
What You’ve Learned
Congratulations! You’ve successfully:
- Set up the EBRAINS UI Ecosystem - Cloned and installed the monorepo
- Understood monorepo structure - Know where apps and libraries live
- Generated a React app - Used both NX Console GUI and CLI
- Ran development server - Experienced hot reload in action
- Built a custom app - Created a styled “Hello EBRAINS” application
- Used ecosystem commands - Build, lint, test, and graph
- Followed Git conventions - Created proper commits
Next Steps
1. Add the EBRAINS Design System (Recommended)
Add the EBRAINS Design System to Your App
Transform your basic app into a professional EBRAINS application! This tutorial shows you how to:
- Replace custom HTML with EBRAINS components
- Use buttons, cards, alerts, and forms
- Apply design tokens for consistent styling
- Build a complete dashboard page
Time: 30-40 minutes | Perfect next step after this tutorial!
2. Connect to EBRAINS APIs
Fetch real data from EBRAINS services:
- Knowledge Graph API for datasets
- IAM API for user authentication
- Forms API for submissions
3. Create a Shared Library
Extract reusable code into a library:
Use it across multiple apps!
Additional Resources
Command References
Documentation
- NX Documentation - Official NX guides
- React Documentation - Learn React deeply
- Vite Documentation - Build tool configuration
- TypeScript Handbook - Type system guide
Community
- EBRAINS Chat - Ask questions in #tech-support
- EBRAINS GitLab - Report issues or request features
You’re now ready to build real applications in the EBRAINS ecosystem! Start with small features, use the design system, and don’t hesitate to ask for help. Welcome to EBRAINS development!