Tutorial: Publish Your First Docker Image to EBRAINS Registry
In this tutorial, you’ll containerize a simple web application and publish it to the EBRAINS Docker Registry, making it available for deployment across EBRAINS infrastructure.
What you’ll build: A containerized Python Flask app published to EBRAINS Harbor registry.
Time required: 25-35 minutes
Prerequisites:
- An EBRAINS account with registry access
- Docker installed (Installation guide)
- Basic command line knowledge
- A text editor
Part 1: Verify Docker Installation
Step 1: Check Docker is Installed
Expected output:
If you see “command not found”, install Docker first:
- Mac: Docker Desktop for Mac
- Linux: Docker Engine for Linux
- Windows: Docker Desktop for Windows
Step 2: Verify Docker is Running
If you see a table header (even if empty), Docker is running:
Part 2: Create a Simple Web Application
Let’s create a simple Python Flask app to containerize.
Step 3: Create Project Directory
Step 4: Set Up Virtual Environment
Create and activate a Python virtual environment:
Your terminal prompt should now show (venv) indicating the virtual environment is active.
Step 5: Create the Application
Create app.py with the following command:
Step 6: Create Requirements File
Create requirements.txt with the following command:
Step 7: Test Locally (Optional)
Before containerizing, test the app works:
Open another terminal and test:
You should see:
Press Ctrl+C to stop the app.
Part 3: Containerize Your Application
Step 8: Create a Dockerfile
Create Dockerfile (no extension) with the following command:
Step 9: Create .dockerignore
Create .dockerignore to exclude files from the image:
Step 10: Build Your Docker Image
What this does:
docker build- Build an image-t my-ebrains-app:1.0.0- Tag it as “my-ebrains-app” version “1.0.0”.- Use current directory as build context
Expected output:
Step 11: Verify Your Image
You should see your image:
Step 12: Test Your Container Locally
In another terminal, test it:
If it works, press Ctrl+C to stop the container.
Part 4: Access EBRAINS Docker Registry
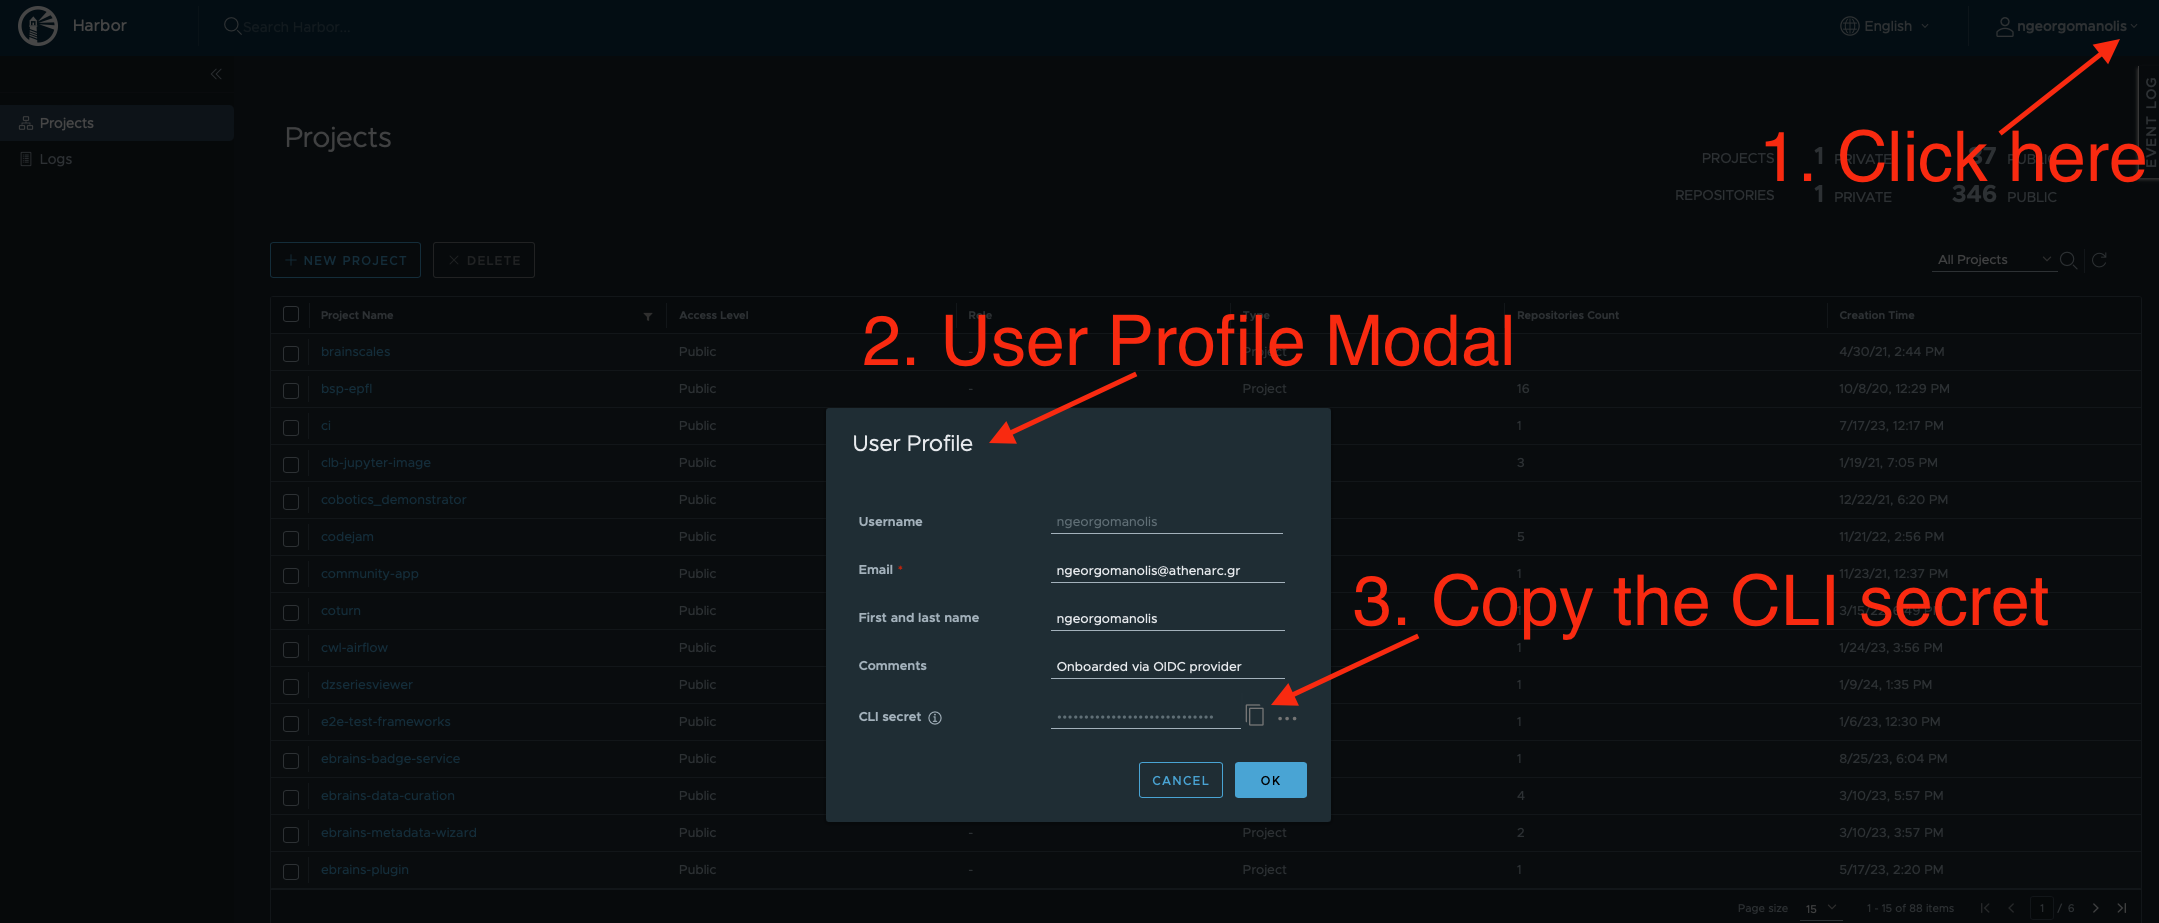
Step 13: Get Your CLI Secret
The EBRAINS Docker Registry uses Harbor. You’ll need your CLI secret (not your regular password).
- Visit EBRAINS Docker Registry
- Log in with your EBRAINS credentials
- Click your username in the top-right corner
- Select “User Profile”
- Find the “CLI secret” section
- Click “Generate CLI secret” or copy the existing one
Step 14: Login to EBRAINS Registry
Enter when prompted:
- Username: Your EBRAINS username (usually email)
- Password: Your CLI secret (NOT your EBRAINS password)
Expected output:
Part 5: Create a Harbor Project
Step 15: Create Your Project
Harbor organizes images into projects (like namespaces).
- Go to EBRAINS Registry Projects
- Click “New Project” (top left)
- Fill in the form:
- Project Name:
my-project(lowercase, hyphens allowed) - Access Level:
- Private (default) - Only members can pull
- Public - Anyone authenticated can pull
- Project Name:
- Click “OK”
Part 6: Push Your Image to EBRAINS Registry
Step 16: Tag Your Image for EBRAINS Registry
Docker images must be tagged with the full registry path:
Format breakdown:
Verify the new tag:
You should see both tags pointing to the same image ID:
Step 17: Push to the Registry
Expected output:
Step 18: Verify in Harbor UI
- Go to EBRAINS Registry
- Click “Projects” in the left sidebar
- Click on “my-project”
- You should see “my-ebrains-app” listed
- Click on the image name to see:
- All tags (versions)
- Image size
- Vulnerability scan results
- Pull command
- Creation date
Part 7: Pull and Run Your Image
Step 19: Clean Local Images (Optional)
To simulate pulling from another machine, remove your local images:
Step 20: Pull from EBRAINS Registry
Expected output:
Step 21: Run the Pulled Image
Flags explained:
-d- Run in detached mode (background)-p 5000:5000- Map port 5000 (host:container)--name my-app- Name the container “my-app”
Test it’s running:
View running containers:
Stop the container when done:
Part 8: Version Management
Step 22: Create a New Version
Let’s update the app and publish version 2.0.0:
Edit app.py to change the version:
Step 23: Build, Tag, and Push New Version
Step 24: Verify Multiple Versions
In Harbor UI, you should now see:
1.0.0(145 MB, created 20 minutes ago)2.0.0(146 MB, created 2 minutes ago)latest(146 MB, created 2 minutes ago)
Part 9: GitLab CI/CD Integration
Step 25: Automate Builds with GitLab CI
Create .gitlab-ci.yml in your project:
Step 26: Set GitLab CI/CD Variables
In your GitLab project:
- Go to Settings → CI/CD → Variables
- Add two variables:
- CI_REGISTRY_USER: Your EBRAINS username
- CI_REGISTRY_PASSWORD: Your CLI secret (mark as “Masked”)
Now every push to main or develop automatically builds and pushes!
Next Steps
Now that you’ve published your first image, you can:
- Automate with CI/CD - Set up GitLab pipelines to build on every commit
- Deploy to Kubernetes - Use your images in EBRAINS Kubernetes clusters
- Add health checks - Improve Dockerfile with HEALTHCHECK instruction
- Scan for vulnerabilities - Review Harbor’s security scan results
- Create image variants - Build images for different environments (dev/staging/prod)
Additional Resources
- Docker Build Tag Push Reference - Quick command reference
- Docker Registry Reference - Harbor registry commands
- EBRAINS Docker Registry (Harbor)
- Docker Documentation
- Dockerfile Best Practices
- Harbor Documentation
Summary
You’ve successfully:
- Created a containerized web application
- Built a Docker image with proper structure
- Authenticated with EBRAINS Docker Registry
- Created a Harbor project
- Published multiple image versions
- Pulled and ran images from the registry
- Learned version management strategies
- Set up GitLab CI/CD automation